Recycle That Old Kiln
by David G. Wright
I have been salt-firing off and on for over fifteen years. First, as a student at the Philadelphia College of Art and later at the University of Colorado, Peters Valley Crafts Center, University of the Arts and now at the Perkins Center for the Arts in Moorestown, NJ. My initiation to salt-glazing was like many other people, taking the advice from someone who said, "don't throw it in the trash, put it in the salt-kiln, besides it couldn't get any worse." Well, it did, and I have since then learned that you must make clay work for the salt-fired surface, or as Don Reitz puts it, "The pots must demand it." I started as everyone else did in the seventies by using straight salt in a hard-brick kiln and firing around thirty hours to cone ten. I also experimented with soda and wood-firing and achieved great results with both. There is nothing like the rich effects of a wood or salt kiln to make you feel closer to the elements of the earth and indeed, make you feel more directly connected to your pottery.
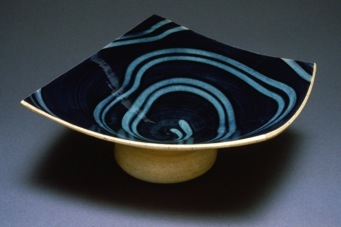
I eventually dropped my temperature to cone six because of the energy crunch and a desire to do my part. I also began using a mixture of half salt, half sodium bicarbonate, and the addition of 3% borax to melt the mixture at cone six. This combination resulted in a glossy and fairly respectable salt surface with little to none of the desired orange-peel effect one expects with salt, (more recently, I have eliminated the borax completely.) However, the results were acceptable to me because my interest in vapor firing was changing and I no longer desired the thick, heavy, pebbly look of salt. Rather, I was more concerned with unifying the disparate parts of my pottery, and creating a feeling of sensuality on its surface.
At this time I was using the salt kiln at the University of the Arts or firing the wood kiln at the Chester Springs Studio (a wonderful art center and the only place I know that will rent a 40 cubic foot wood kiln). However, I was getting tired of the packing and unpacking of the ware, the breakage, traveling back and forth, and the extremely long hours, either waiting or stoking. Because I work slowly and the pots are small, it took forever to make enough work to fill the kiln. If I had a bad firing, it could ruin a great deal of work. I especially disliked my dependence on these kilns to finish my work. It was then that I decided I needed a change, so I decided to put salt and wood firing on the back burner for a while and try some other things that I had been wanting to do.
As luck would have it, in the summer of 1993 I offered a class on 'Alternative Kiln Building' at the Perkins Center for the Arts in Moorestown, New Jersey. I had begun to think about the great number of kilns that I had seen discarded over the years, mostly because elements were broken, or bricks were chipped. Replacing parts or patching holes could have easily repaired many of these kilns. Often the owners were either uninformed or just too lazy. I always felt that so many of these kilns were simply wasted.
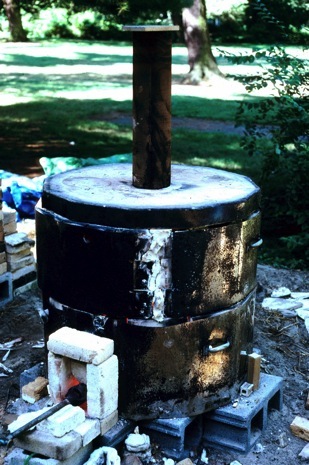
So, with the help of a great group of students, I altered an old 12 cubic foot electric kiln, that was headed for the trash, into a propane fired, updraft vapor kiln, using salt, soda and wood. We fire the kiln within a temperature range of cone one through eight. My primary goal for the class was first, to recycle the kiln, and second, to make a small enough kiln to allow students the opportunity to glaze fire their pottery in a kiln that they would be comfortable firing. This type of kiln is certainly not meant to be a permanent longtime solution to salt firing, but rather it is a kiln that can introduce the fundamentals of gas and vapor firing to students, without the expense or commitment to construction and space. The kiln will eventually disintegrate and have served its purpose as a teaching tool.
The particular kiln that we used had no separate sectional rings, but only one large 31" wall of soft brick, held together by a sheet metal casing. Its floor was connected to the wall and could not be easily separated. We started by cutting a hole in the top of the lid for an exit flue, and another on the lower side of the kiln just above the floor, for the burner. We pulled the elements and electrical work out, and filled the element grooves with a mixture of fireclay, grog and alumina. We coated the entire interior with a salt wash of half alumina, half kaolin. This ensures that the kiln will last for some time. The shelves we had available to us were made of cordierite. These were washed with the same mixture on top, and then the bottom of each shelf was washed with a much thinner coating. We eventually replaced these shelves with silicon carbide. To this date I have fired the kiln at least thirty times with very little wear and tear on the sidewalls. The bottom of the kiln however, has begun to deteriorate and will soon be replaced with a hard-brick floor instead.
The kiln is fired in an oxidation atmosphere using propane, until cone four starts to bend, at which time I introduce both salt and wood (about 2-3 lb. of salt and ten 1" x 1" x 12" sticks or branches) over the next half hour. The kiln is fired to cone six on bottom and is usually lower on top, around cone two. I am able to reach cone 5-6 in about four to five hours. With some adjustments like a split brick, damper and a protective shelf below the exit hole, the firings are shorter, more dependable and even richer with surface activity. Every firing is unique, as I like to try different approaches and techniques each time I fire. I usually throw any combustible I can find lying around the art center into the kiln. As an inexpensive and experimental teaching tool, this kiln is extremely beneficial and a whole bunch of fun.
During this time, I found myself putting more and more of my own work in this little kiln. As a potter, I have learned that the size of this kiln and the speed in which it can be fired could be a great advantage to me when I build my own salt kiln. Of course, I don't achieve the kind of drippy, ash covered richness that you expect in a cone ten firing, but that is not what I am after. The firings are softer, and not so severe, or labor intensive. Vapor firing in four to five hours allows me the freedom to do other things in my life, like gardening and spending more time with my daughters, Alanna and Emily Rose. My priorities in life are very simple - the only thing more precious than art is nature, and the only thing more precious than nature are children - especially mine! Anything that allows me to be with them more often is definitely appreciated.
Old kiln bricks are another wonderful resource for small experimental kilns. Many old brickyards or tile companies have old bricks that they are discarding and are glad to give to you. I love to build temporary kilns using these old bricks. The benefit of using single bricks is that you can rebuild another type of kiln right away. It is a great learning tool as you can alter the shape of the kiln to discover which design works best. You might build one type of kiln for straight reduction, and then rebuild it to be used for sawdust firing. The experience of designing, building and firing a temporary kiln is wonderful! It is a great group project for any age level. Many electric kilns, as well as loose, soft and hard bricks, are carelessly tossed away when they could be put to good use for teaching purposes. I hope this short article might interest clay people to think before they throw out these materials. Perhaps they could donate their unwanted kilns to a local art center to be recycled for just this purpose.
So here I find myself again, having a love affair with vapor firing, and frustrated that I am once again dependent on another kiln. Oh well, I guess it truly is time for me to build my very own salt kiln.
Glaze Recipes for Recycled Kiln
by David G. Wright
Many glazes can be used for this type of firing, but because of the differences in temperature within the kiln, I prefer to use glazes that have greater than normal firing ranges. I have either developed my own glazes, or found ones that work for this purpose. Several glazes are listed below:
Amber Gloss C/1-6
Redart Clay 1 part A burnt orange when thin and amber when thick
Gerstly Borate 1 part in oxidation. Celadon green in reduction.
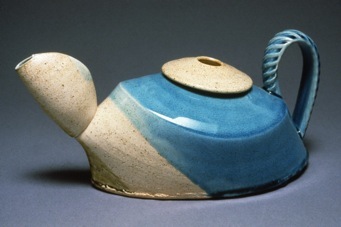
Wright Water Blue C/1-6
Fritt 3110 59% A luscious turquoise in oxidation.
Flint 17
EPK 12
Strontium Carbonate 09
Lithium Carbonate 03
Total 100%
2% Bentonite
5% Copper Carbonate
or
2% Manganese Dioxide A bright glossy purple grape color.
1/4% Cobalt Carbonate
Blue-Green Matt C/4-8
Cornish Stone 45% A wonderful glaze for both ox. and reduction.
Whiting 30
EPK 20
Gerstly Borate 05
Total 100%
Add:4% Copper Carbonate
4% Tin Oxide
Peach Sig.
OM#4 Ball Clay 180g For bone dry or bisquit ware- flashes nicely.
Redart Clay 020g
Water 800g
Total 1000g
Calgon 010g